Usually, when we talk about architecture, we talk about the application itself. We think about layers, domain models and interfaces to structure our code. Most of the time the tests will follow this architecture. We create one test per service and mirror our code.
user-dashboard.service.js
user-dashboard.service.spec.js
This is fine for unit and even integration tests, but will not work for end-to-end (E2E) tests as we do with Protractor for AngularJS. E2E tests focus on complete test scenarios instead of single components. So we cannot mirror our code structure (no one-test-per-service). Also, E2E tests are more likely to become complicated as the test scenarios are bigger and cover multiple components (instead of a single one as a unit test would do). If we don’t think about test architecture, we will sooner or later run into trouble:
- Test cases will become very big with a couple of hundred lines of code
- When the application changes we must touch each and every test case
- Selecting HTML elements becomes a mess
In the following, I want to present a simple approach for a component-based test architecture. My example uses AngularJS and Protractor, but it can be used with any framework which knows the concept of components.
You find a sample implementation here.
Application Structure
Whenever we develop a UI, we will end up with multiple pages (called views). These pages will be made up of components (called widgets).
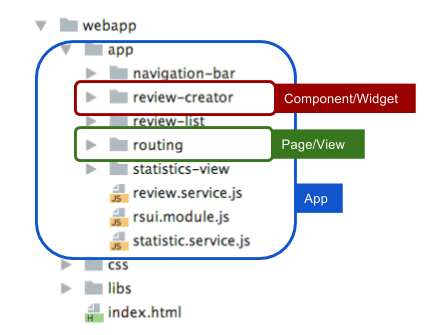
Here’s an example from my sample implementation:
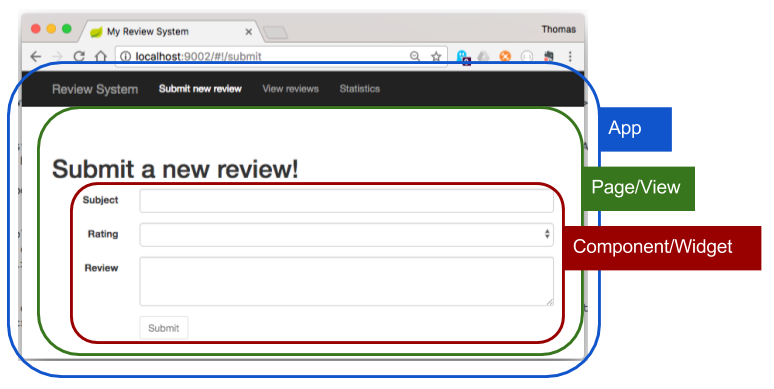
The app contains multiple pages which contain multiple components. You will find this structure not only in a visual way, but also in the code. For example, the HTML looks like this:
<html ng-app="my-app"> <!-- app -->
    <div ui-view="page-content"> <!-- page -->
        <h1>Submit a new review!</h1>
        <review-creator> <!-- component -->
            ...
        </review-creator>
    </div>
</html>
And the package structure might look like this:
No matter where we are, our application can be broke down to pages with components inside.
A component can be anything, from a simple text input field to a complete form (as shown in the example).
All E2E tests will be based on this structure (app -> pages -> components).
    +-----+
    | APP |
    +-----+
    |
    +-----+------+
          | PAGE |
          +------+
          |
          +-----+---------+
          |     | HEADING |
          |     +---------+
          +-----+----------------+
                | REVIEW-CREATOR |
                +----------------+
Test Objects
For each component, we create a test object. A test object is a controller for the component. It can set values, press buttons or read text - whatever the component does.
Let’s take the review-creator component (shown above) as an example.
The component offers three input fields (subject, rating and content) as well as a submit button.

Its HTML is a simple form:
<form name="submitReviewForm" class="form-horizontal">
    <div class="form-group">
        <label class="col-sm-2 control-label">Subject</label>
        <div class="col-sm-10">
            <input type="text" name="subject" ...>
        </div>
    </div>
    <div class="form-group">
        <label class="col-sm-2 control-label">Rating</label>
        <div class="col-sm-10">
            <select name="rating" ...>
                <option ...>
            </select>
        </div>
    </div>
    <div class="form-group">
        <label class="col-sm-2 control-label">Review</label>
        <div class="col-sm-10">
            <textarea name="content" ...></textarea>
        </div>
    </div>
    <div class="form-group">
        <div class="col-sm-offset-2 col-sm-10">
            <button name="submit" ...>Submit</button>
        </div>
    </div>
</form>
(Source on GitHub)
A test object should offer an API to control the component in the E2E tests.
For the review-creator it should enable us to fill the input fields and press the button to submit.
(function () {

    var component = null;

    function setComponent(componentToUse) {
        component = componentToUse;
    }

    function setSubject(subject) {
        var inputField = component.element(by.name('subject'));
        inputField.sendKeys(subject);
    }

    function setRating(index) {
        component.all(by.tagName('option')).then(function(options){
            options[index + 1].click();
        });
    }

    function setContent(content) {
        var inputField = component.element(by.name('content'));
        inputField.sendKeys(content);
    }

    function submit() {
        var button = component.element(by.name('submit'));
        button.click();
    }

    // This is the final API of the test object. By using these simple
    // methods we can fill in data and easily create a test case.
    module.exports = {
        setComponent: setComponent,
        setSubject: setSubject,
        setRating: setRating,
        setContent: setContent,
        submit: submit
    };
})();
(Source on GitHub)
By using such a test object, we achieve several goals:
- We create an easy-to-use API to control components in E2E tests
- Selecting HTML nodes is isolated in a single place and encapsulated
- We don’t work on the complete HTML DOM, but only on a single component
Especially the last point is very important: The HTML DOM can become very complex in modern web applications. Usually, we don’t care about this, because it’s 2018, jQuery is dead and AngularJS helps us to forget about all the ugly stuff the web is build on. However, Protractor E2E tests force us to select HTML elements from the DOM, so we should at least take a minute or two to think about it.
Selecting HTML elements from the DOM can be a hard and ugly job. It’s also one of the first things which breaks when elements are moved, renamed or reordered. Test objects help us to break the HTML down to smaller junks which are easy to handle. Let’s take the HTML of the app as shown in the beginning. It’s easy to imagine that this example would look much more complicated in reality. Here’s a screenshot of the real HTML in Chrome:
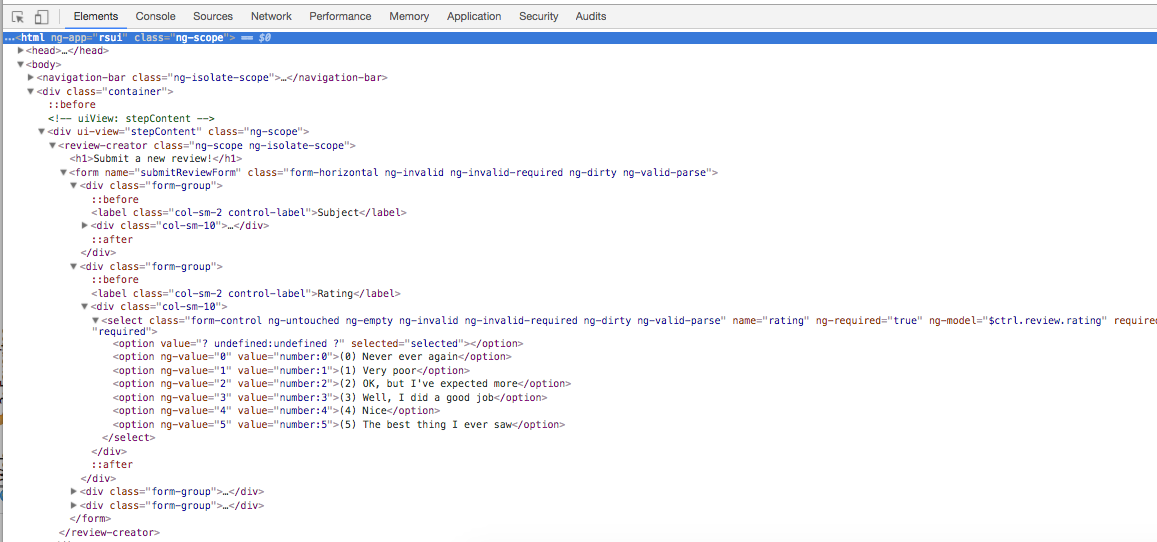
By using test objects, we narrow the HTML to a single component.
We only care about what’s inside of <review-creator> ... </review-creator>.
This takes us directly to the next step: page objects.
Page Objects
The same way test objects encapsulate components, page objects encapsulate views. Let’s do an example again:
[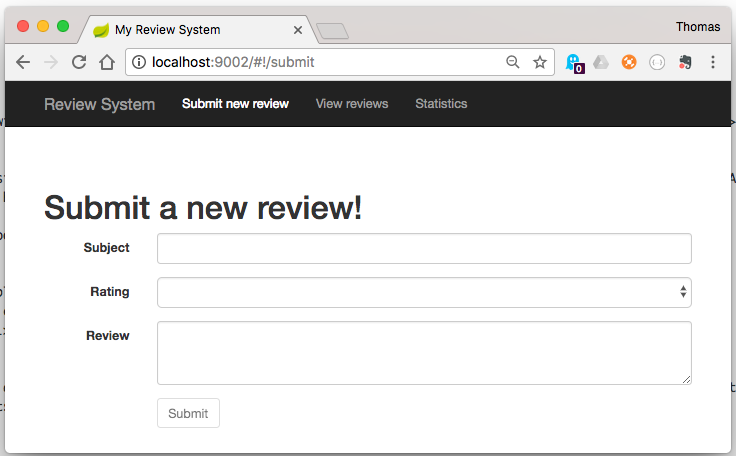
This view offers a single use case:
it can submit a review.
To do so, it uses a heading (Submit a new review!) plus a single component (the review-creator) with some input fields and a submit button.
A page object to control this view might look like this:
(function () {

    // We use the test object which we created above. This object
    // offers us an API to control the component. In this case it
    // lets us set a subject, a rating and some content. Finally
    // we can submit the review by pressing a button.
    var reviewCreatorController = require('../components/review-creator.controller.js');

    function submitReview() {

        // The page object knows how the view looks like. It knows which components
        // it contains and how to find them.
        var reviewCreator = element(by.tagName('review-creator'));

        reviewCreatorController.setComponent(reviewCreator);
        reviewCreatorController.setSubject("My Review");
        reviewCreatorController.setRating(5);
        reviewCreatorController.setContent("This is my review");
        reviewCreatorController.submit();
    }

    module.exports = {
        submitReview: submitReview
    };
})();
Note how the encapsulation goes on:
The page object uses the test object (review-creator.controller.js) which we created above.
Any low-level stuff is encapsulated there.
The page object only selects the component (element(by.tagName('review-creator'))) and passes it to the test object (reviewCreatorController.setComponent(reviewCreator)).
On the other hand, the test object doesn’t need to know where the component is located and how to find it.
It’s passed in by the page object.
E2E Tests
Now that we have test objects as well as page objects, writing the actual E2E tests becomes very easy. Every E2E test should test a concrete scenario or use case. In our example, a use case could look like this:
As a user, I want to be able to submit a review.
And the test case would be:
// This is the page object which controls the "submit view".
var submitPageController = require('../pages/submit-page.controller.js');

// And this is a page object for the initial "landing page". I didn't include the
// code of this control, but it does  nothing fancy. It just represents the landing
// page and offers a method to jump to the "submit view".
var landingPageController = require('../pages/landing-page.controller.js');

it('As an user, I want to be able to submit a review', function () {
    browser.get("http://localhost:9002");
    landingPageController.goToSubmitPage();
    submitPageController.submitReview();
    expect(...);
});
By using test objects and page objects, the abstraction of our E2E test cases becomes much higher. Instead of dealing with HTML selectors and low-level Protractor stuff, we can focus on our business case. The test cases are easy to read and quick to write. And: If we manage to write a test object for every component as soon as we implement it (just like we would implement a unit test) we will get a powerful toolbox to create E2E test scenarios. Creating those E2E tests could then also be done by a tester who is not so familiar with the actual components as they are encapsulated by the test objects. No knowledge of Protractor, HTML selectors and so on would be needed.
Final Thoughts
- Every component should have its own test objects. As components can be made up of other components, it’s perfectly fine to use test objects in other test objects.
- Page objects are somehow optional. It depends on the complexity of the application if it makes sense. In my sample application I didn’t use any page objects, because each page only contains a single component.
Best regards, Thomas.